


.png)
In this blog I will show you how you can use Named Credentials & External Credentials in API integration. I will be using a third party weather app and integrate it with Salesforce to show the current weather.
We will be using WeatherAPI.com for this integration. I have created a free account over to get the API key.
Now first step here would be to create an External Credentials in Salesforce.
To create an External Credentials you can simply go to Setup --> Named Credentials and click on External Credentials tab as shown below:

Create a principal for it and add your API key as a parameter

Create a new custom header as shown below with the same API key parameter. By creating a custom header here you don't have to create it again in your named credentials.
As a best practice we should use value in the header as a formula. To add the API value as formula you can use below code
{!$Credential.WeatherAPICredentials.key}
In above formula the WeatherAPICredentials is our external credentials name and key is the name of the Principal param.

Now as you have created an External Credentials, let's create Named Credentials.
While creating Named Credentials you need to make sure that Allow Formulas in HTTP Header is checked otherwise it won't be accepting your custom header value formula.

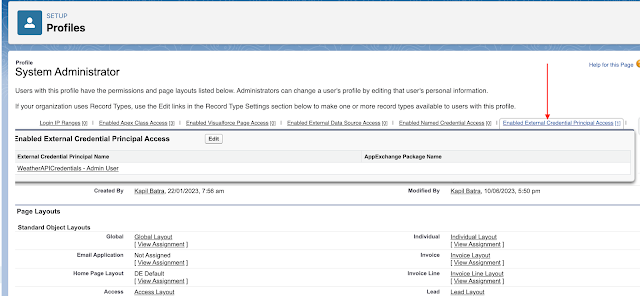
Last but not the least you need to provide permission to your user to access these External Credentials using Profile or Permission Set.
After you create principals and external credentials, take these steps to give permission sets and profiles access to the principals of the external credential.
- From Setup, in the Quick Find box, enter either Permission Sets or Profiles, and then select either Permission Sets or Profiles.
- Click the name of the permission set or profile that you want to modify.
- Take one of these steps.
- For a permission set, click External Credential Principal Access in the Apps section.
- For a profile, click Enabled External Credential Principal Access.
- The Guest User profile isn’t supported for named credentials.
- Click Edit.
- The Edit page displays two columns: one for available external credential principals, and one for external credential principals that are currently enabled.
- External credential principals take the form
- external credential name - external credential principal parameter name
- For example, an external credential principal might have a name like ‘JWT OAuth Credential - Marketing User’.
- Select one or more external credential principals from the list of available principals. Click the Add arrow to move them into the Enabled column.
- Save your changes.
If you have followed above steps then you are good to follow below code in your component.
WeatherAPI.cls
1 2 3 4 5 6 7 8 9 10 11 | public with sharing class WeatherAPI { @AuraEnabled public static string getWeather(String city){ Http http = new Http(); HttpRequest req = new HttpRequest(); req.setEndpoint('callout:WeatherAPI/current.json?q='+city); req.setMethod('GET'); HttpResponse res = http.send(req); return res.getBody(); } } |
WeatherAPI.html
1 2 3 4 5 6 7 8 9 10 11 12 13 14 15 | <template> <lightning-card title="Weather APIs"> <div class="slds-var-m-around_medium"> <lightning-input onchange={handleonchange} label="Search City"> </lightning-input> <br/> <lightning-button label="Get Weather" onclick={buttonClick}> </lightning-button> <br/> <img src={imageURL} /> <b>{condition}</b> </div> </lightning-card> </template> |
WeatherAPI.js
1 2 3 4 5 6 7 8 9 10 11 12 13 14 15 16 17 18 19 20 21 22 23 24 | import { LightningElement } from 'lwc'; import getWeather from '@salesforce/apex/WeatherAPI.getWeather'; export default class WeatherAPI extends LightningElement { city; condition; imageURL; handleonchange(event) { this.city = event.target.value; } buttonClick() { getWeather({ city: this.city }).then((response) => { console.log("###Response : " + response); let parsedData = JSON.parse(response); this.imageURL = parsedData.current.condition.icon; this.condition = parsedData.current.condition.text; }) .catch((error) => { this.condition = 'No matching location found.'; console.log('###Error : ' + JSON.stringify(error)); }); } } |
Output

Checkout Complete Video Tutorial Below


.png&description=Weather APIs Integration | Named Credentials & External Credentials in #Salesforce | LWC Stack ⚡️)
0 Comments